Constructing 4 Jumpsuits
Deutsch
 (Photo Credit: © CATWALKPIX.COM)
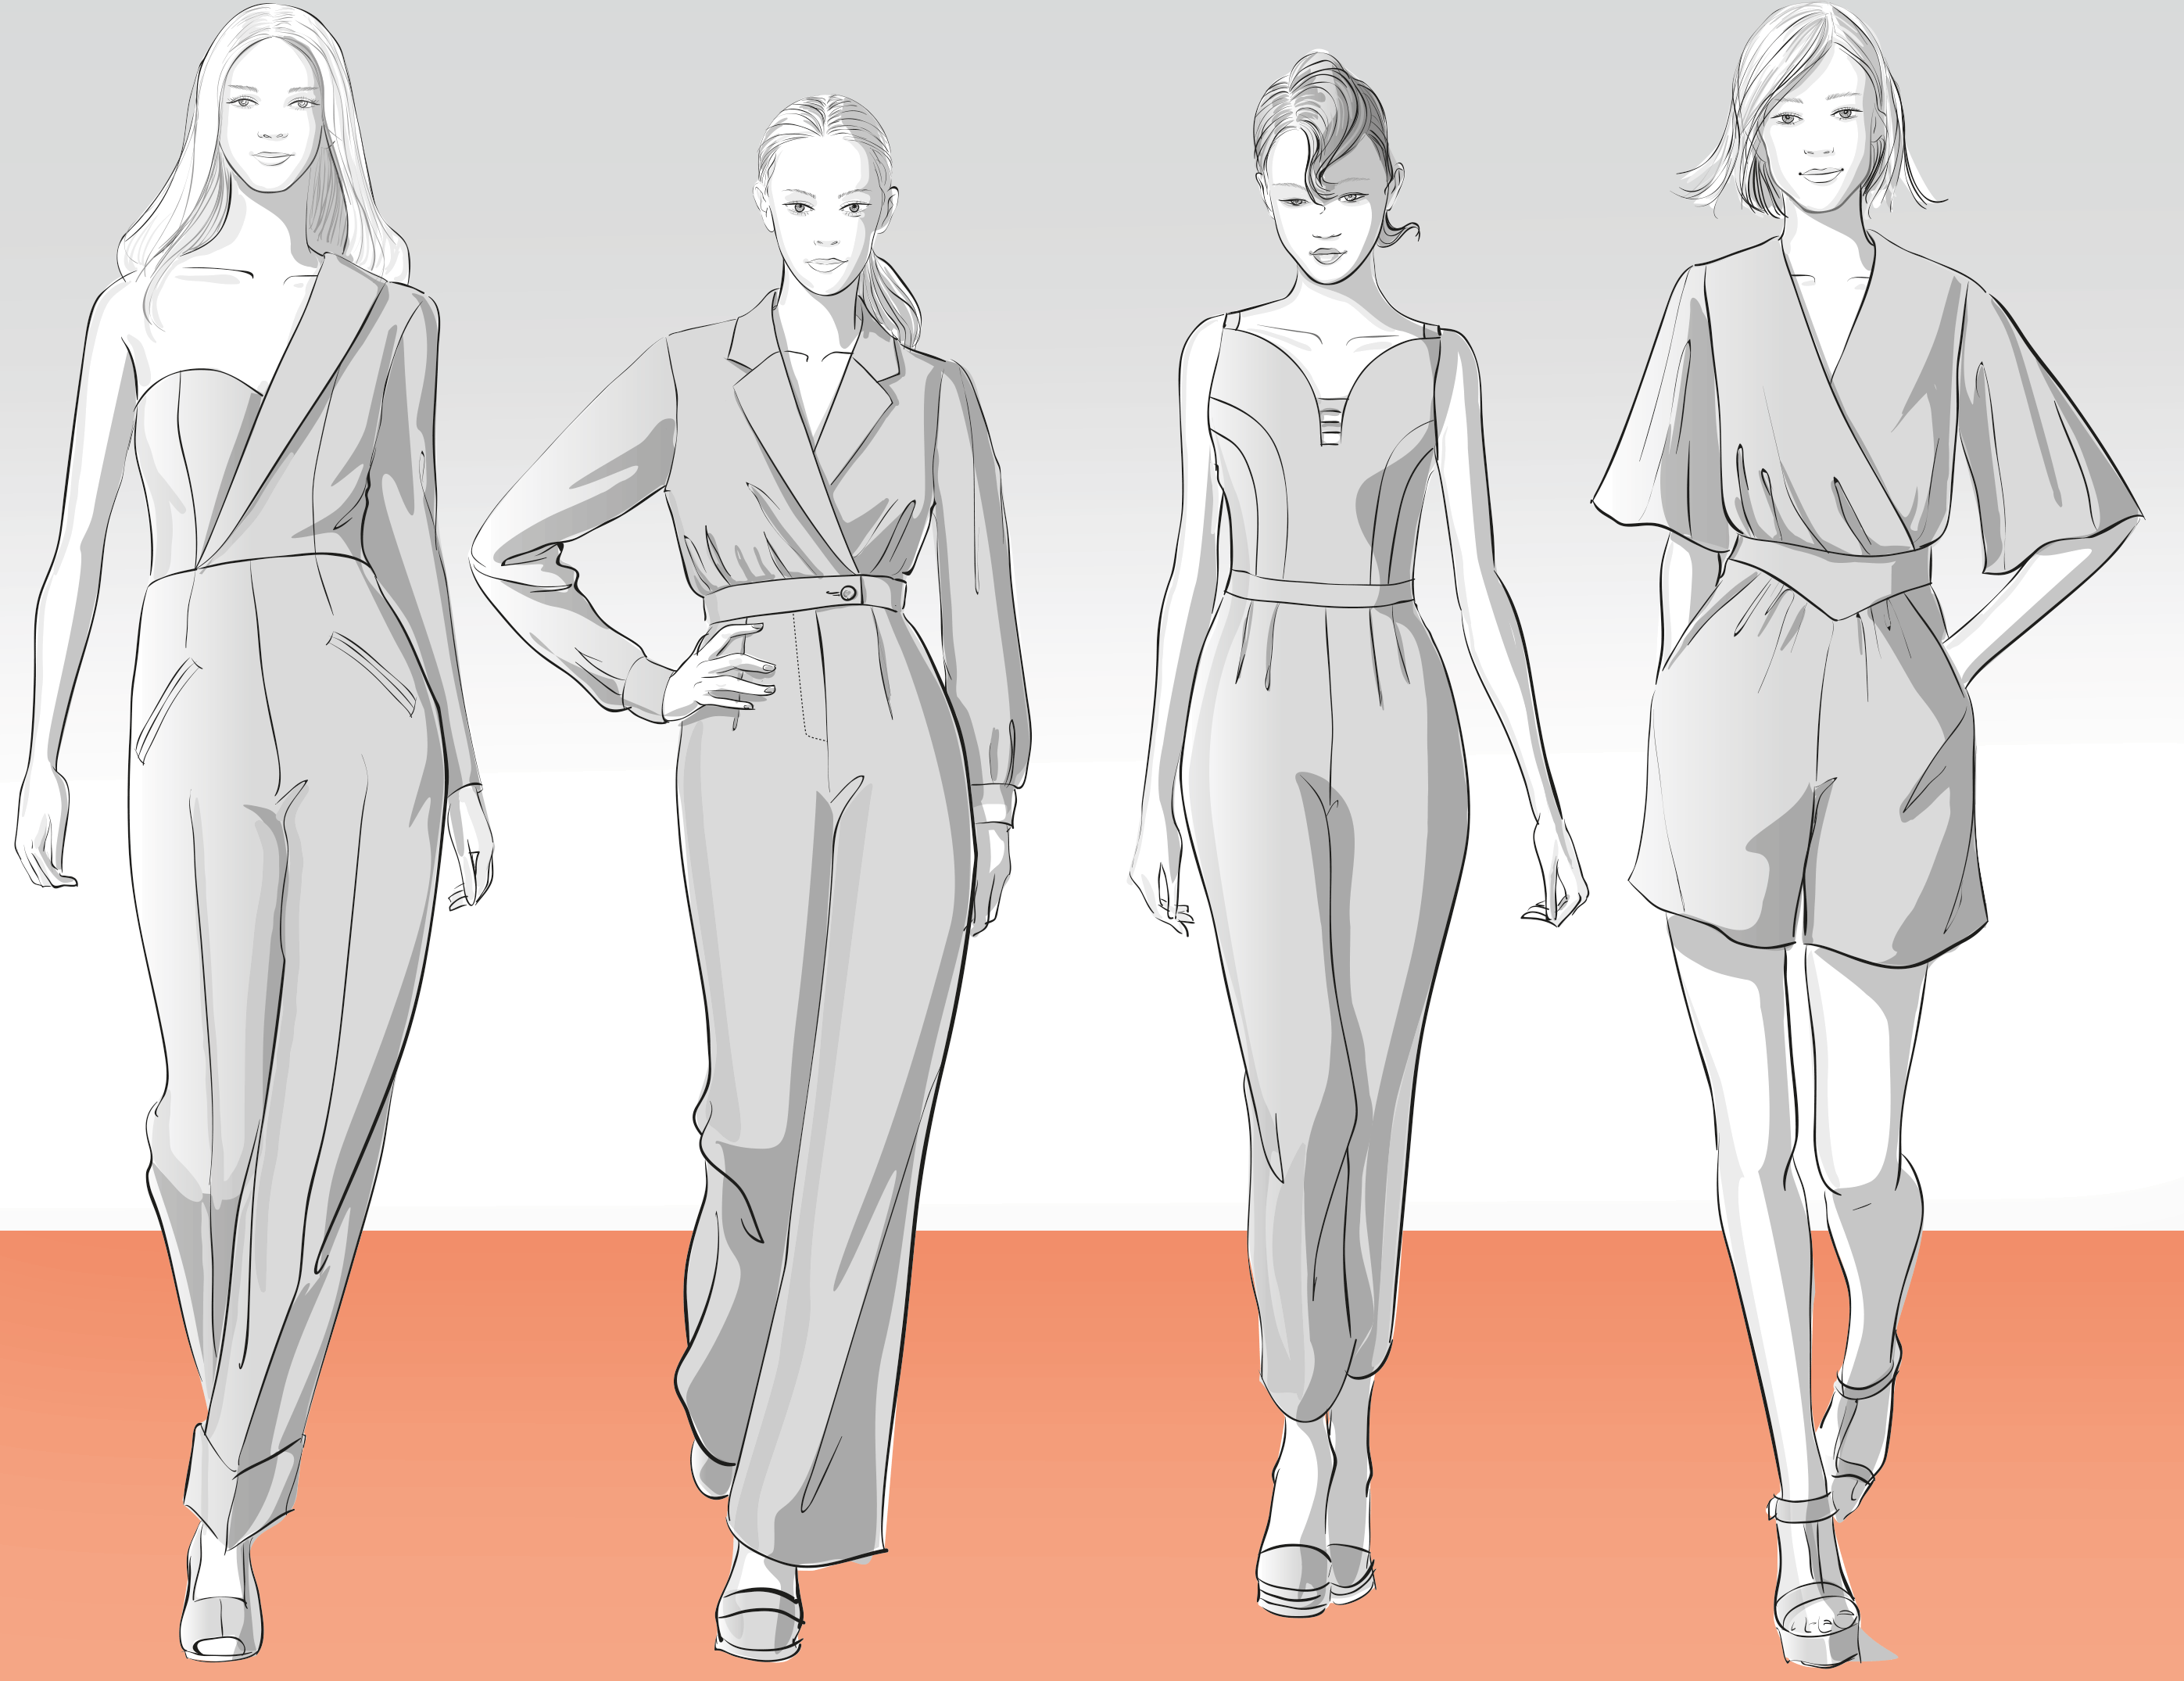
One-piece jumpsuits are without doubt the ultimate style statement! Whether short or long, fitted or baggy – every woman should be the proud owner of this garment. Why? The big advantage of a jumpsuit is that you do not have to worry about matching top and trousers. Just jump in and you are perfectly styled! What was only for workers once, is now perfectly suited as a business, leisure or party outfit. Our four designs show a suitable solution for every occasion..
You find the complete pattern construction in our jornal Rundschau for women 5.2018.
The designs
 (Photo Credit: Drawing V. Feyerabend)
The extra length at the waist is the most important part for the pattern development. If this is too short, the fabric pulls unpleasantly in the crotch area. Either lower the crotch or add extra length at the waist of the bodice pattern.
Design 1 Business-Overall
Template: Basic Blouse Block with Darts in Size 40,
Wearing Ease: Scye depth + 2 cm, back width + 1.5 cm, scye width + 2.5 cm, chest width + 1.5 cm
Basic Pleated Trouser Block in Size 40, Wearing Ease/Finished Measurements: Front and Back Trouser Width 3 cm; Hem width 42 cm, Side Length 103 cm
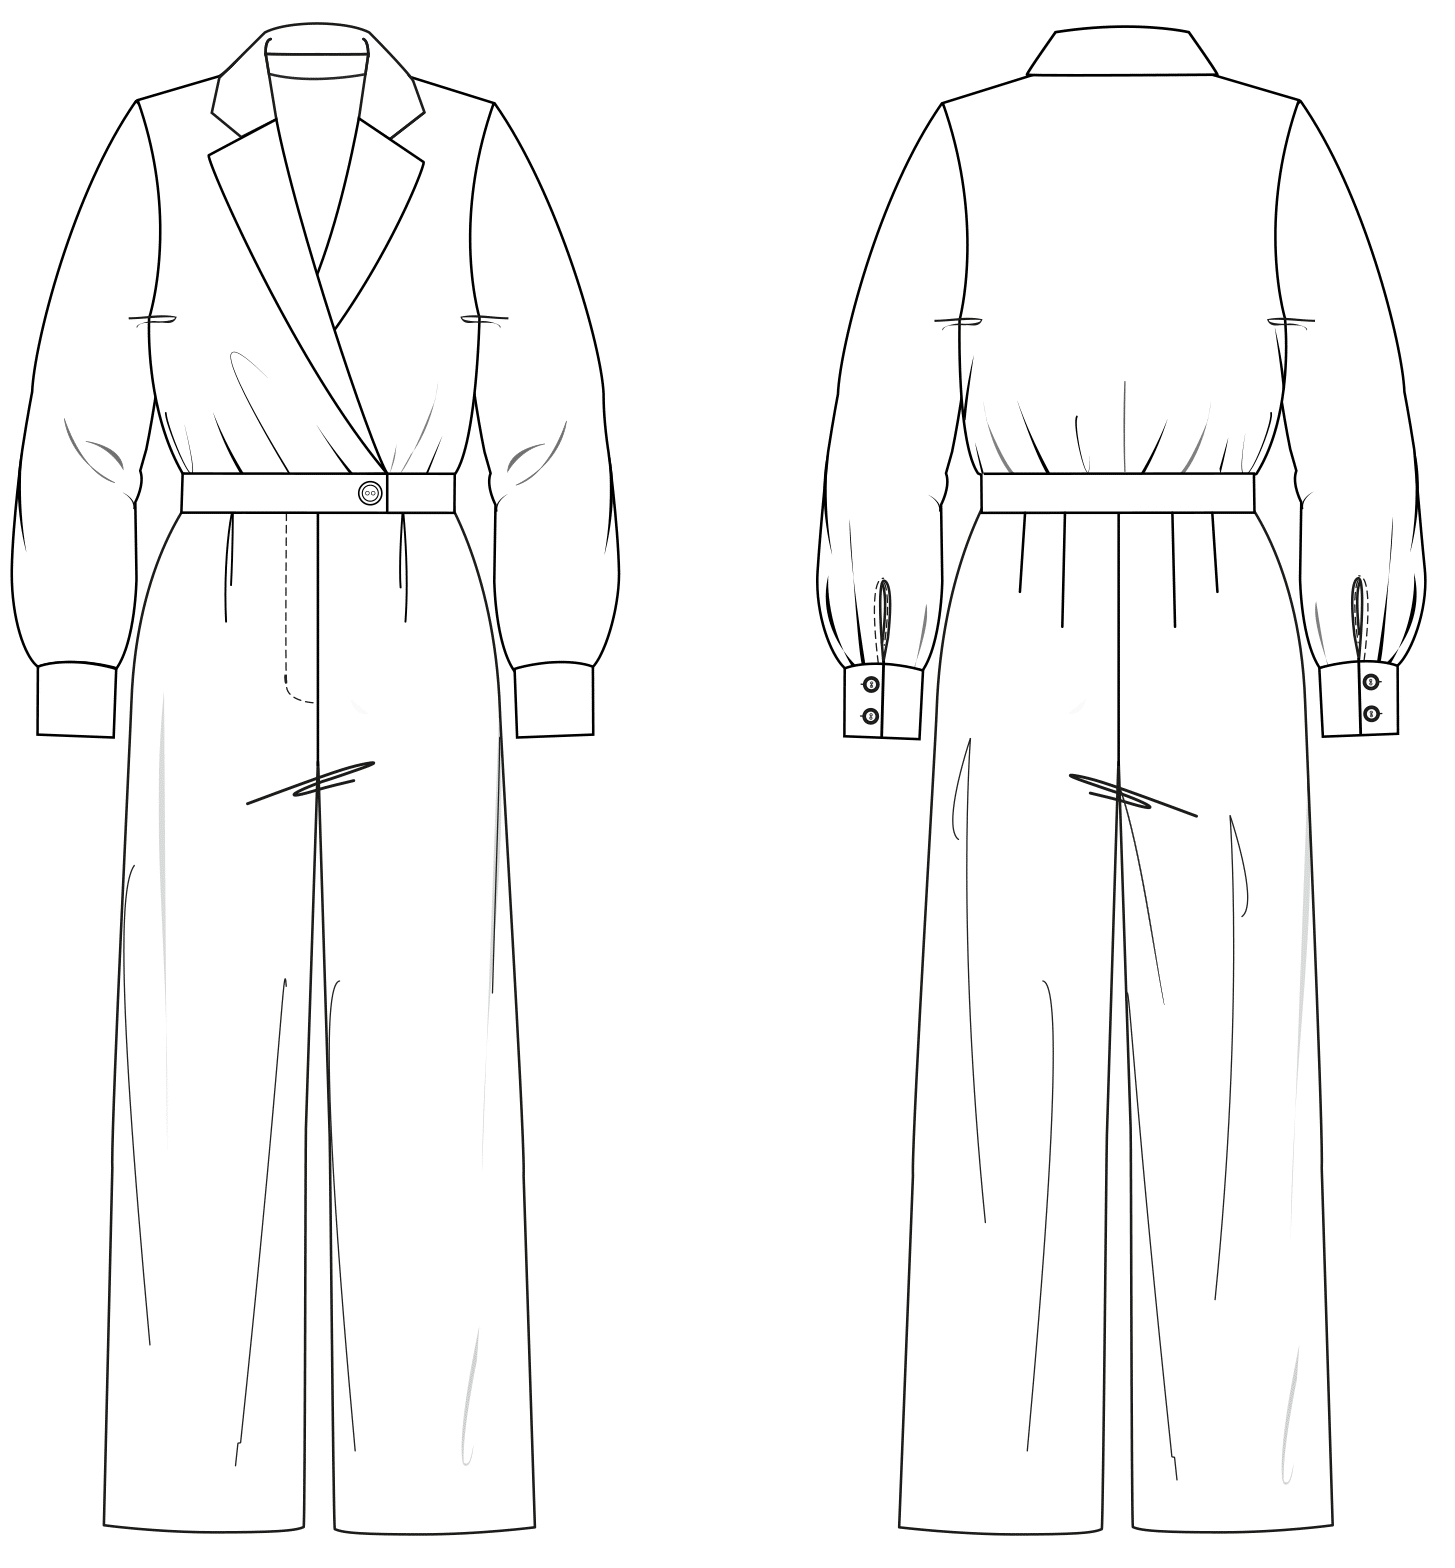 (Photo Credit: Technical Drawing S. Lindner)
Front Pattern
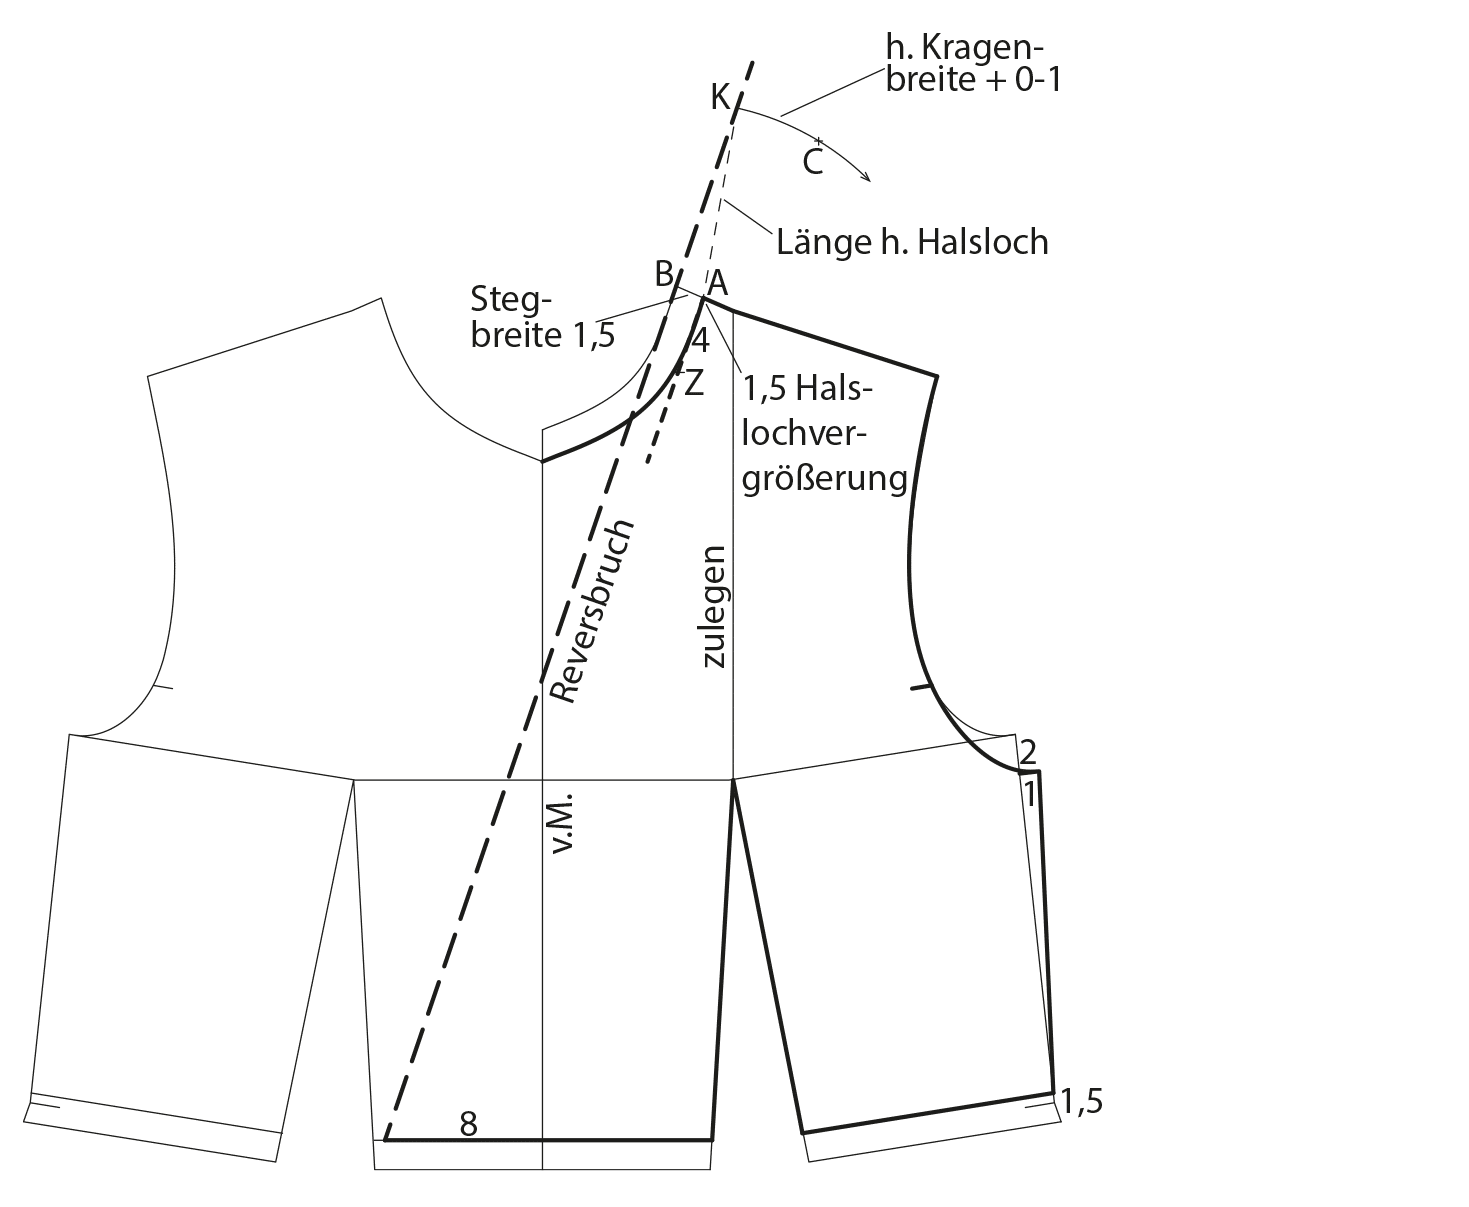
Separate the blouse pattern at the waistline. Draw the front waist dart to the bust dart end point and rotate the bust dart intake to the waist dart. Lower the armhole 2 cm and extend the lowered armhole 1 cm at the sideseam. Draw the new sideseam and the new armhole. Lower the neckline 1.5 cm. Raise the waist 1.5 cm for the 3 cm waistband and the extra length at the waist. Mirror the front pattern over the centre front and mark the lapel break 8 cm away from the centre front at the waist. The 8 cm will be gathered to 6.5 cm at the finished waistband. Measure 1.5 cm from the lowered neck point A to the left to point B for the collarstand.
Draw the lapel break line from the 8-cm point to point B and extend this line 12 cm. Measure the lowered back neckline and transfer this measurement from point A to point K on the extended lapel break line (here: 10 cm). Draw the collar line parallel to the lapel break line and mark point Z 4 cm below the shoulder for the circular arc. Draw a circular arc with point Z as the centre over point K. Measure the back collar width plus 0 cm to 1 cm from the lapel break line along the circular arc. The addition to the collar width depends on the width of the collar and the desired collar fall. Add 1 cm for wide and short lapels as well as double-breasted styles and designs with shoulder pads. No addition is needed for narrow and long lapels.
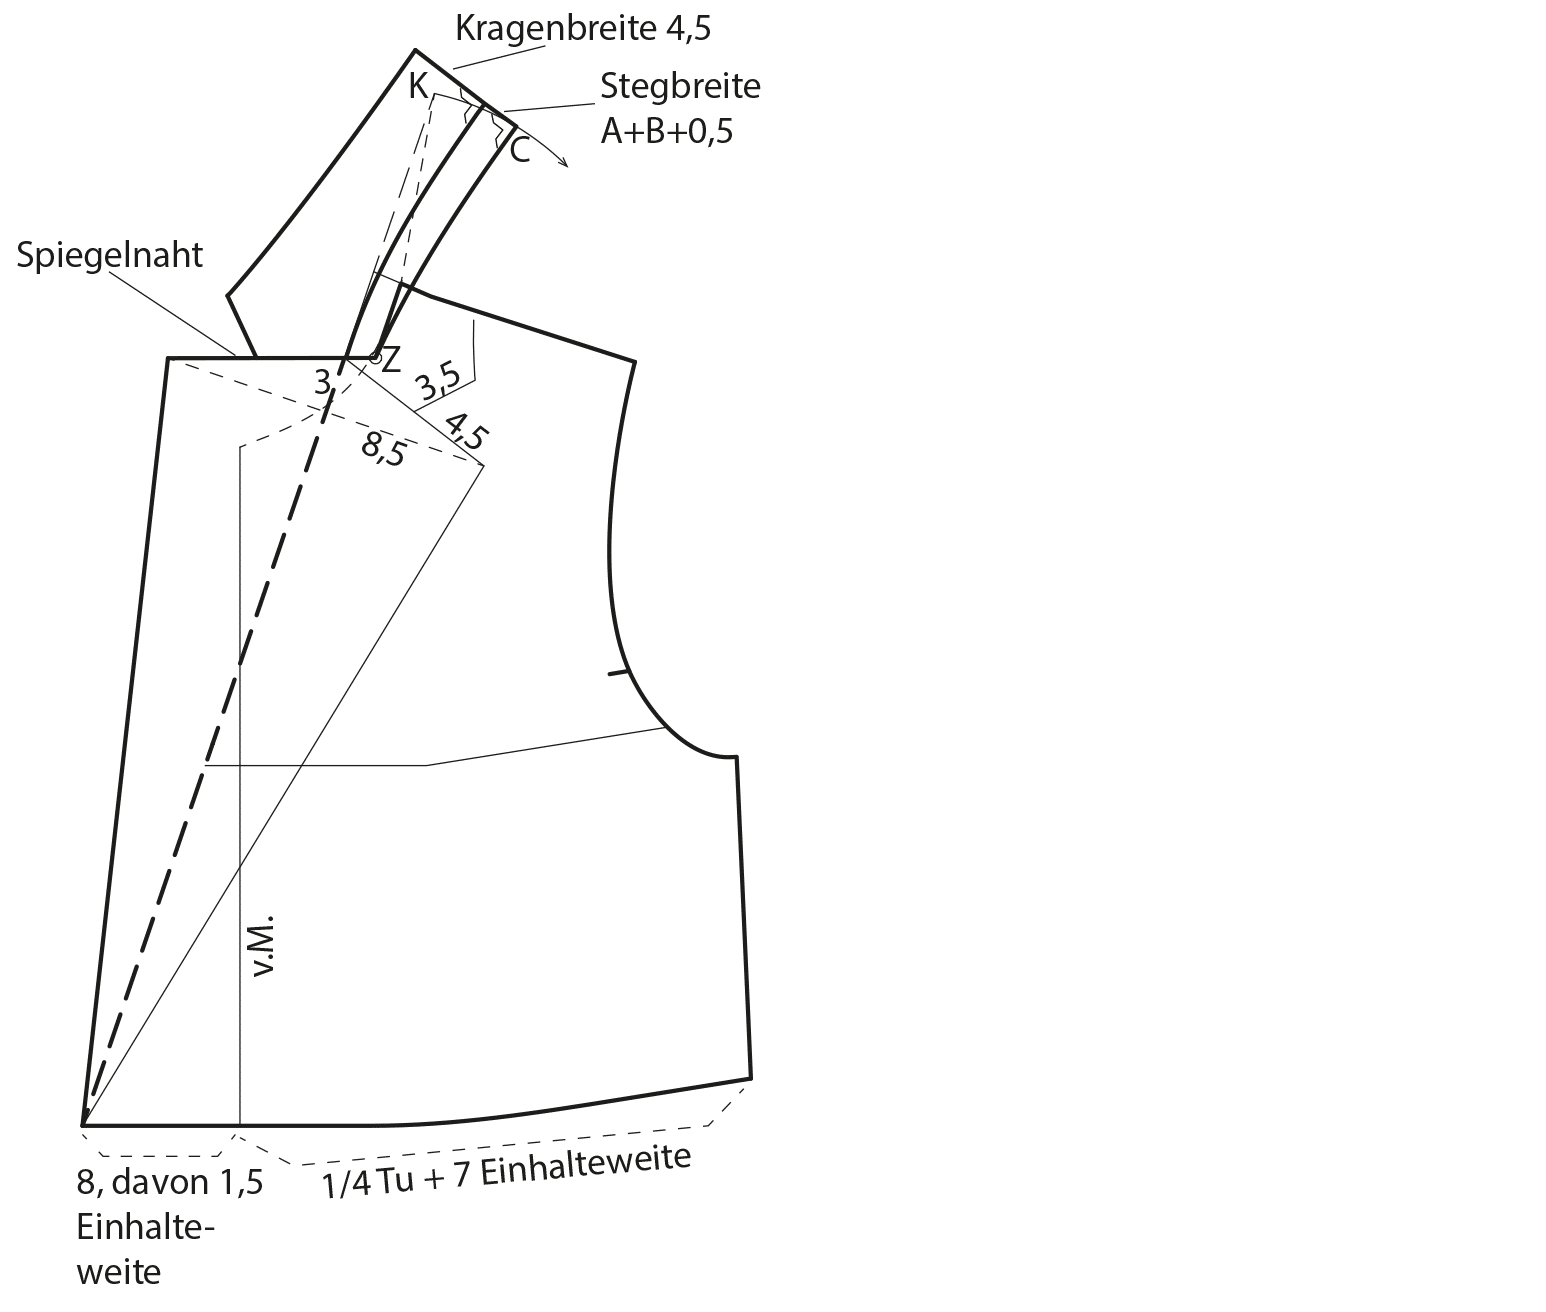
Draw the gorge seam to point Z and draw the collar seam slightly rounded from point C to point Z. Draw the back collar width perpendicular to the collar seam. Measure the collar stand width (here: 2 cm) and then the collar width (here: 4.5 cm) along the perpendicular line. The collar stand should be 0.5 cm wider at the centre back than at the shoulder. Complete the collar shape perpendicular to the centre back according to the illustration. Draw the lapel as shown. Collar line and neckline slightly overlap at the shoulder. Trace a copy of the collar pattern and complete the overlapping section. The waist dart remains in the pattern as gathering width.
Back Pattern
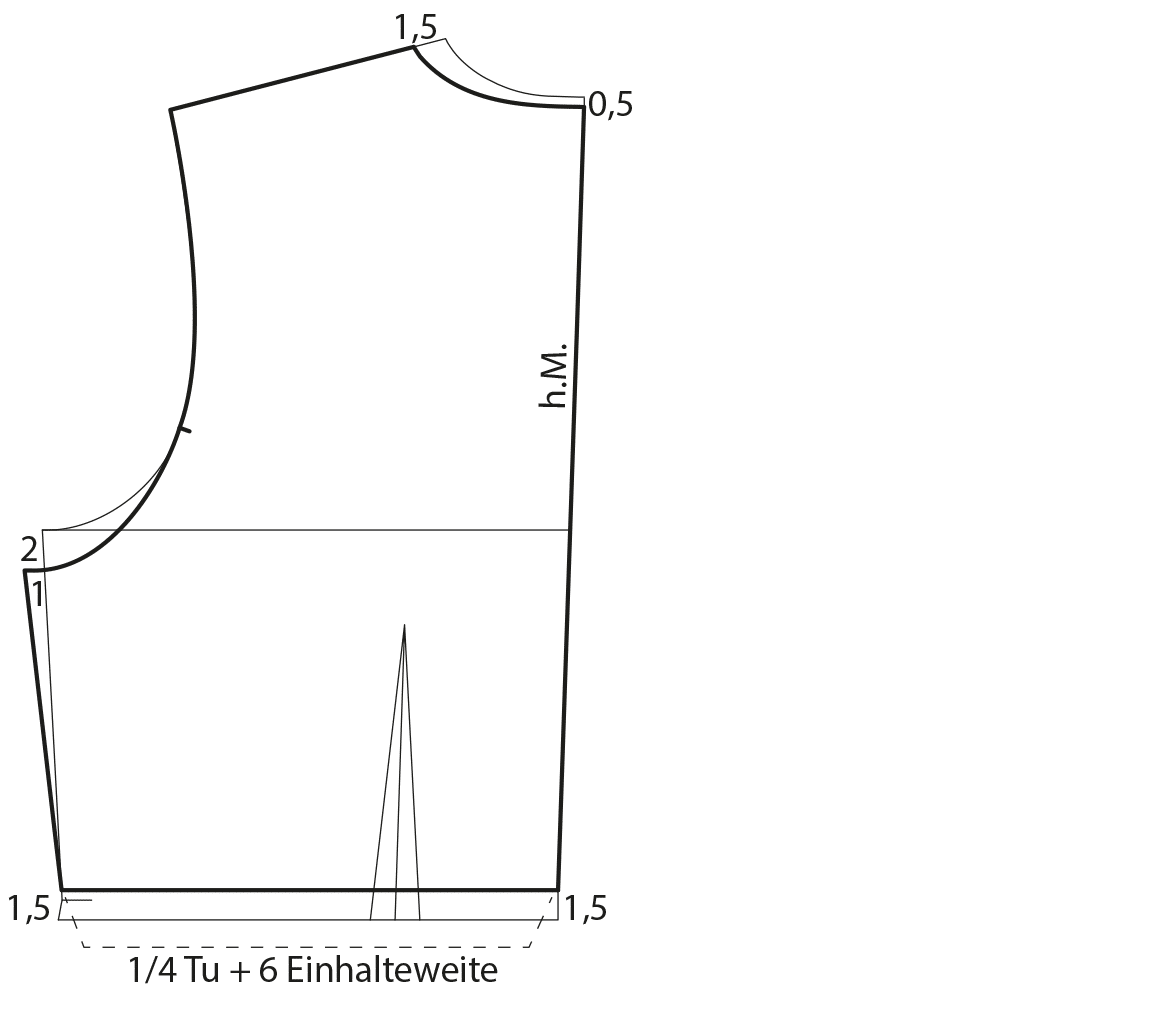 Lower the back neckline 1.5 cm at the shoulder and 0.5 cm at the centre back. Lower and extend the armhole the same amount as on the front pattern. Draw the new sideseam to the raised waistline. The waist dart remains in the pattern as gathering width.
Front and Back Trouser Pattern
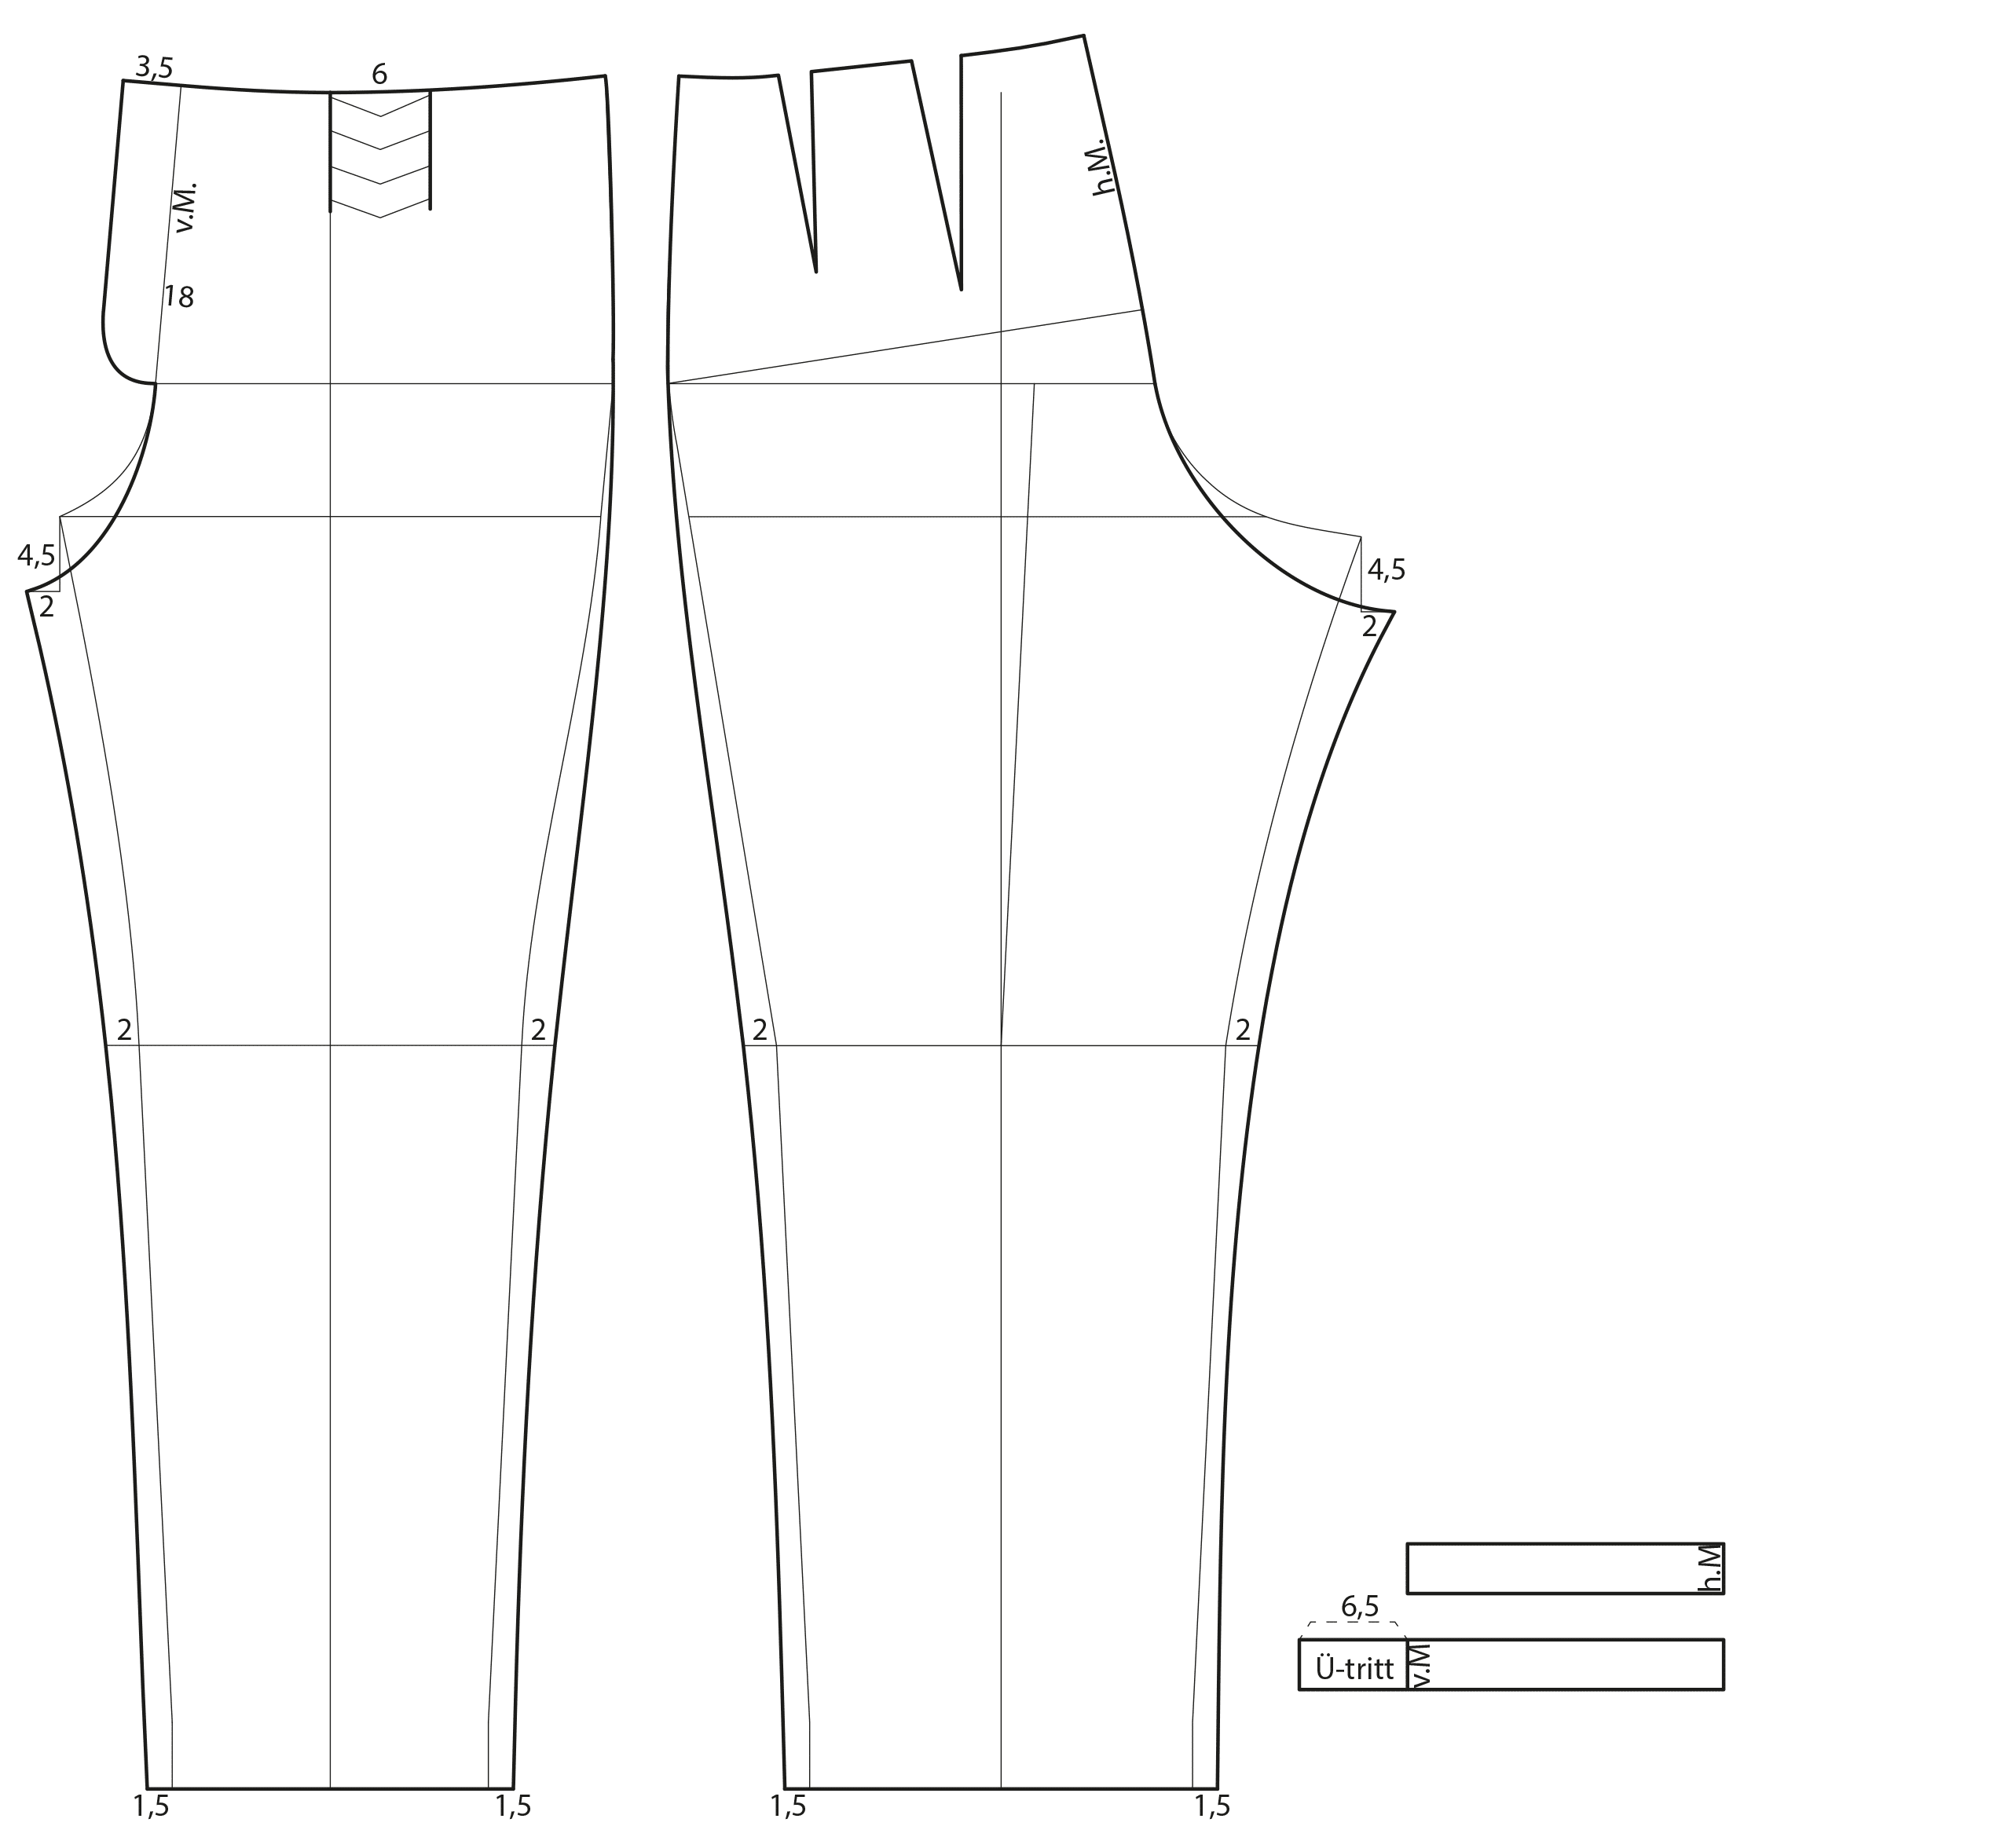
Mark the 6-cm pleat centered on the front waistline. Draw the front fly 18 cm long and 3.5 cm wide. Lower the crotch 4.5 cm and extend the crotch 2 cm at the inseam. Extend the hemline 1.5 cm each side and extend the knee line 2 cm each side. Draw the new sideseam and the new inseam as shown. The lowered crotch plus the waistband gives the overall a 6-cm longer waist length. Add 6.5 cm overlap to the waistband. The front edge and the lapel point meet exactly. Cut the centre back on the fabric fold.
Sleeve
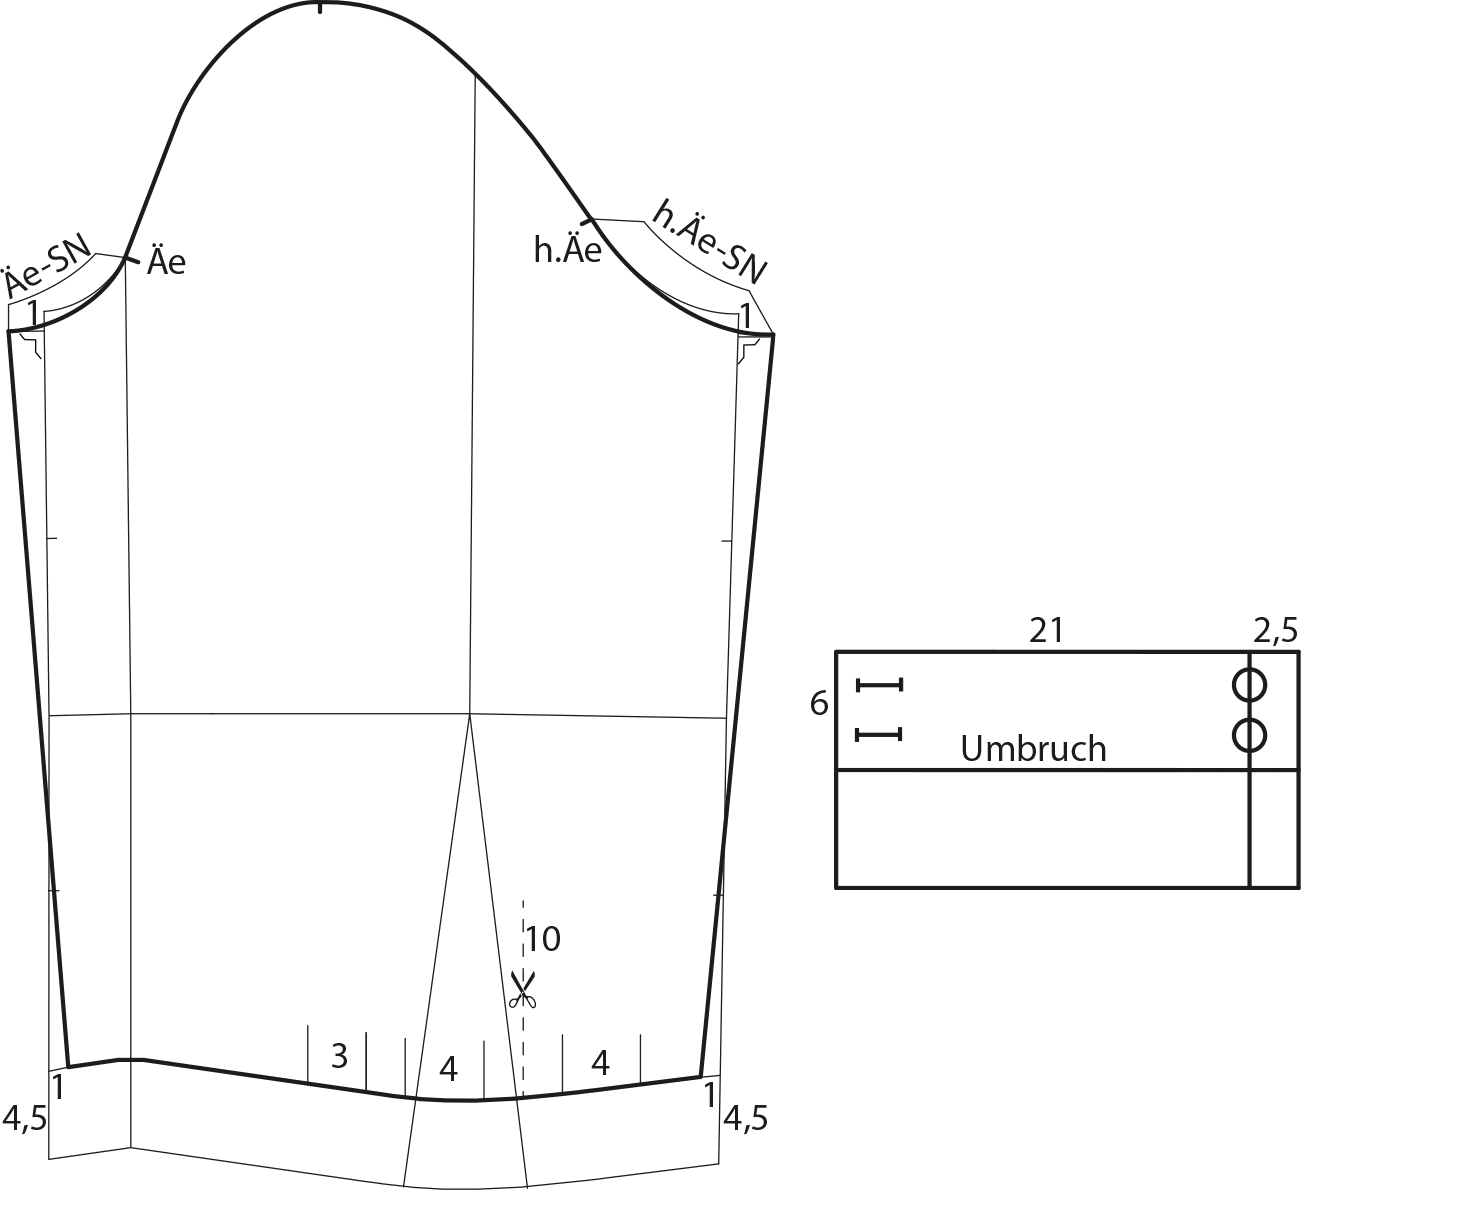
Use a matching one-piece sleeve. Adapt the sleeve to the lowered and extended armhole. Measure half of the amount that the armhole is lowered from the biceps line downward (here: 1 cm). Trace a copy of the front armhole curve from the front armhole notch to the lowered sideseam and transfer the length and shape to the sleeve.
Do the same for the back sleeve curve. Shorten the sleeve around the cuff width minus 1.5 cm overhang. Taper the hem 1 cm at each side. Match the hem width to the cuff and mark the extra length as pleats. Draw the cuff and mirror the cuff over the edge.
Finished Pattern Pieces
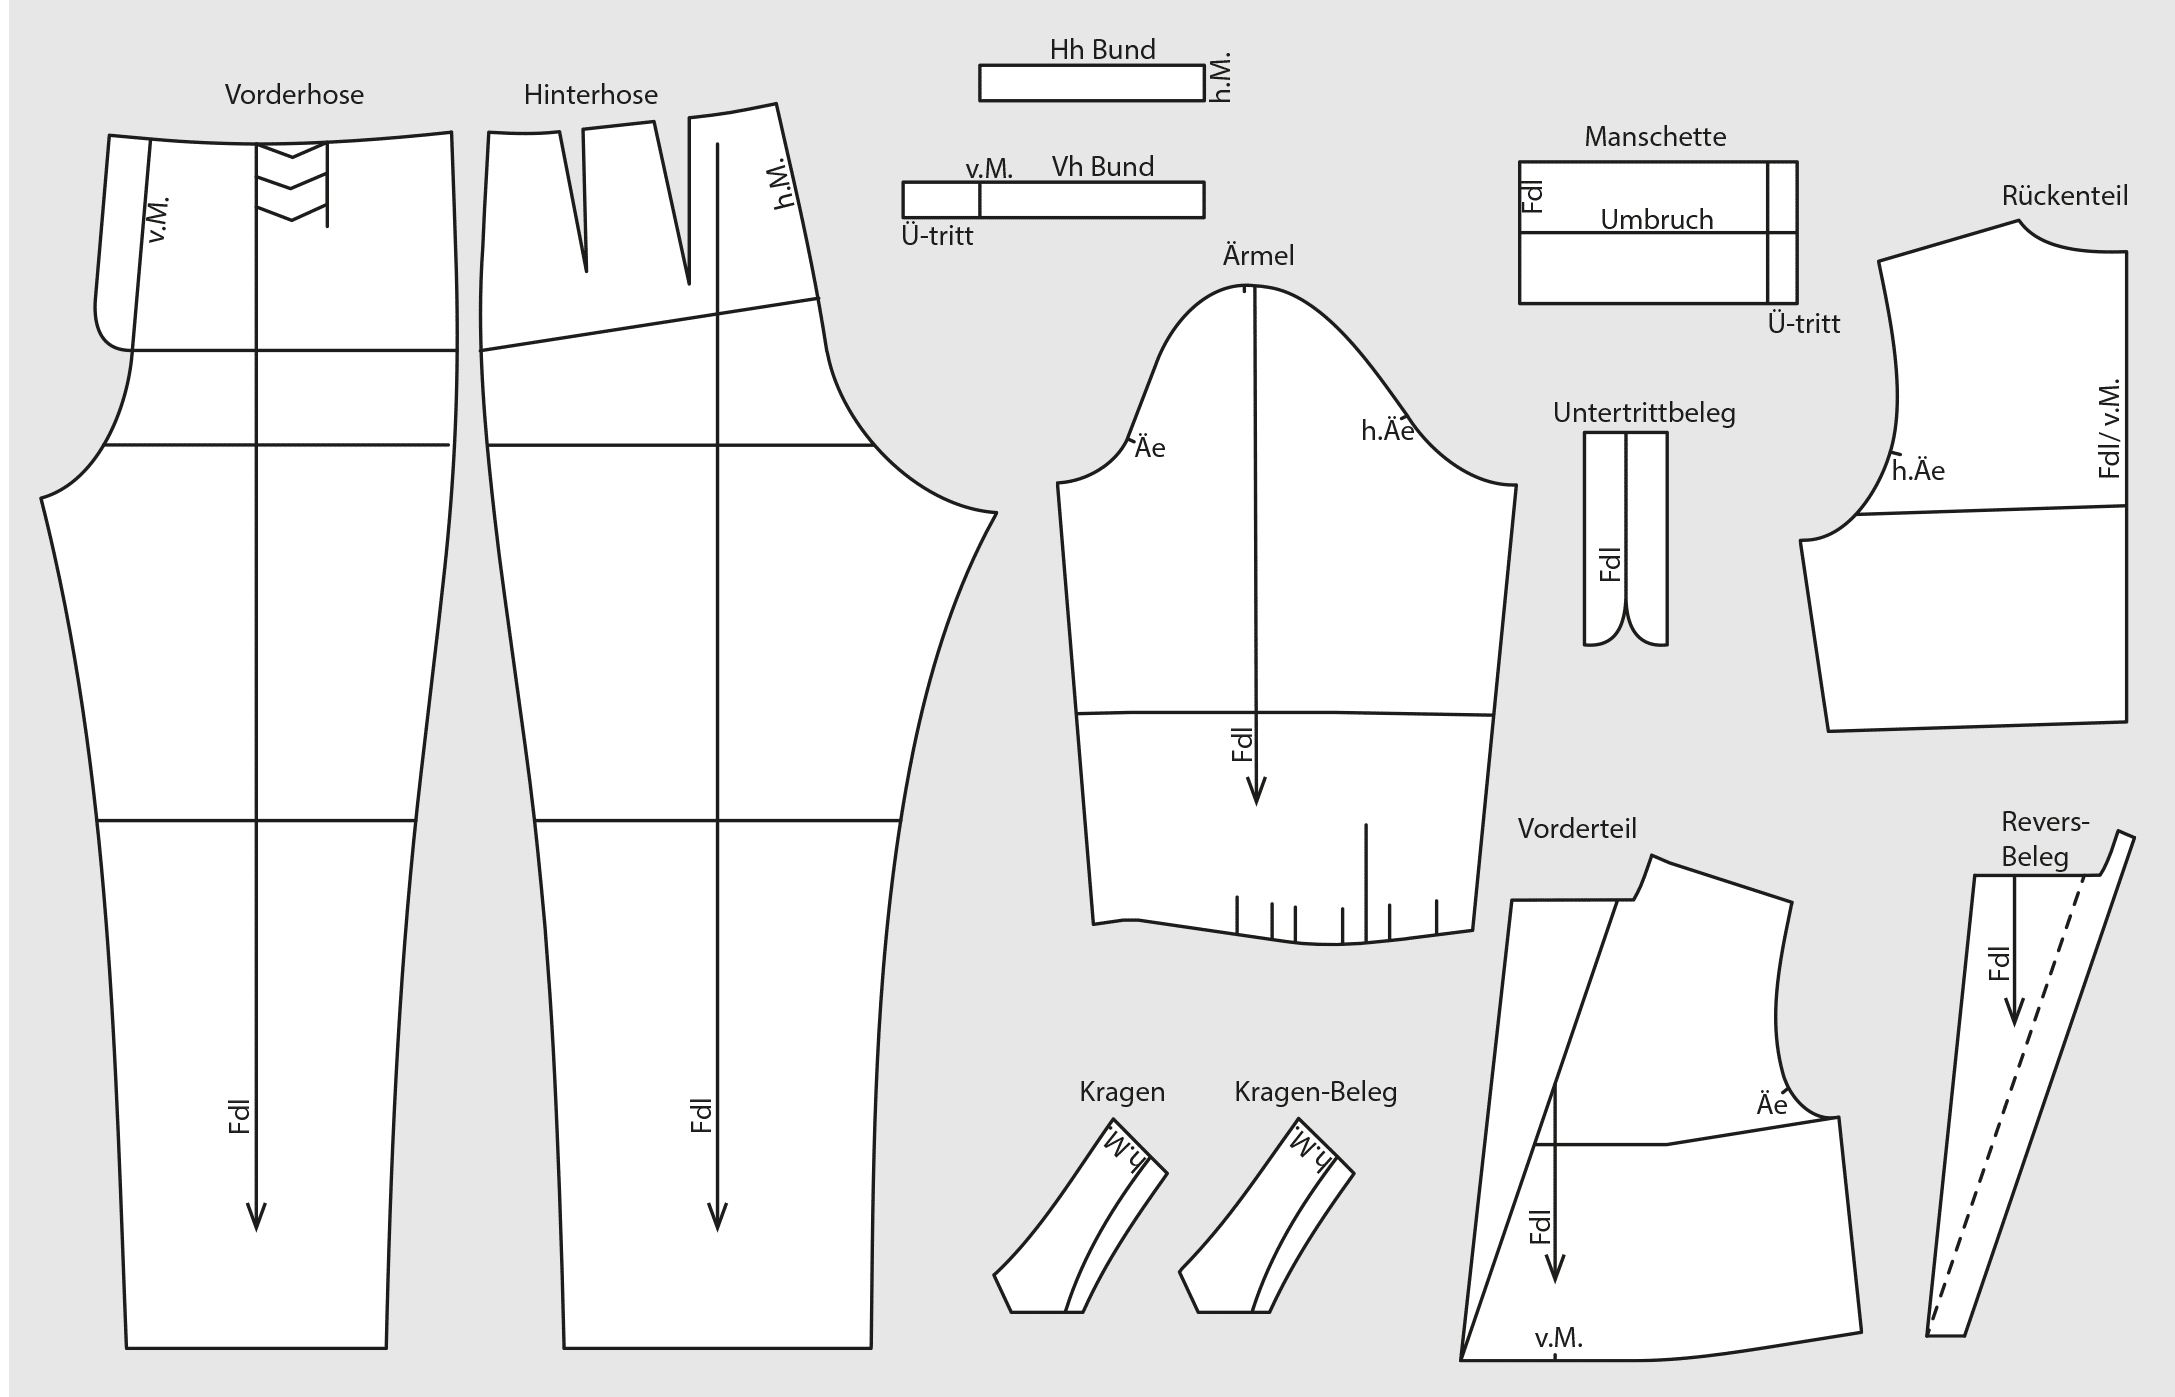
Copy all pattern pieces. Check and blend the seam transitions. Mark the grainlines. Add a button or snap button to the underlap. Trace a copy of the collar and the facings. Add roll width to the upper collar and the front facing.
Design 2 – Off-Shoulder Overall
Template: Basic Corset Block in Size 40, Wearing Ease: Scye depth + 0 cm, back width + 0 cm, scye width + 0 cm, chest width + 1.5 cm
Basic Blouse Block with Darts in Size 40, Wearing Ease: Scye depth + 1 cm, back width + 0.5 cm, scye width + 2 cm, chest width + 1.5 cm
Basic Trouser Block with Darts in Size 40: Hem width 42 cm, Side Length 103 cm
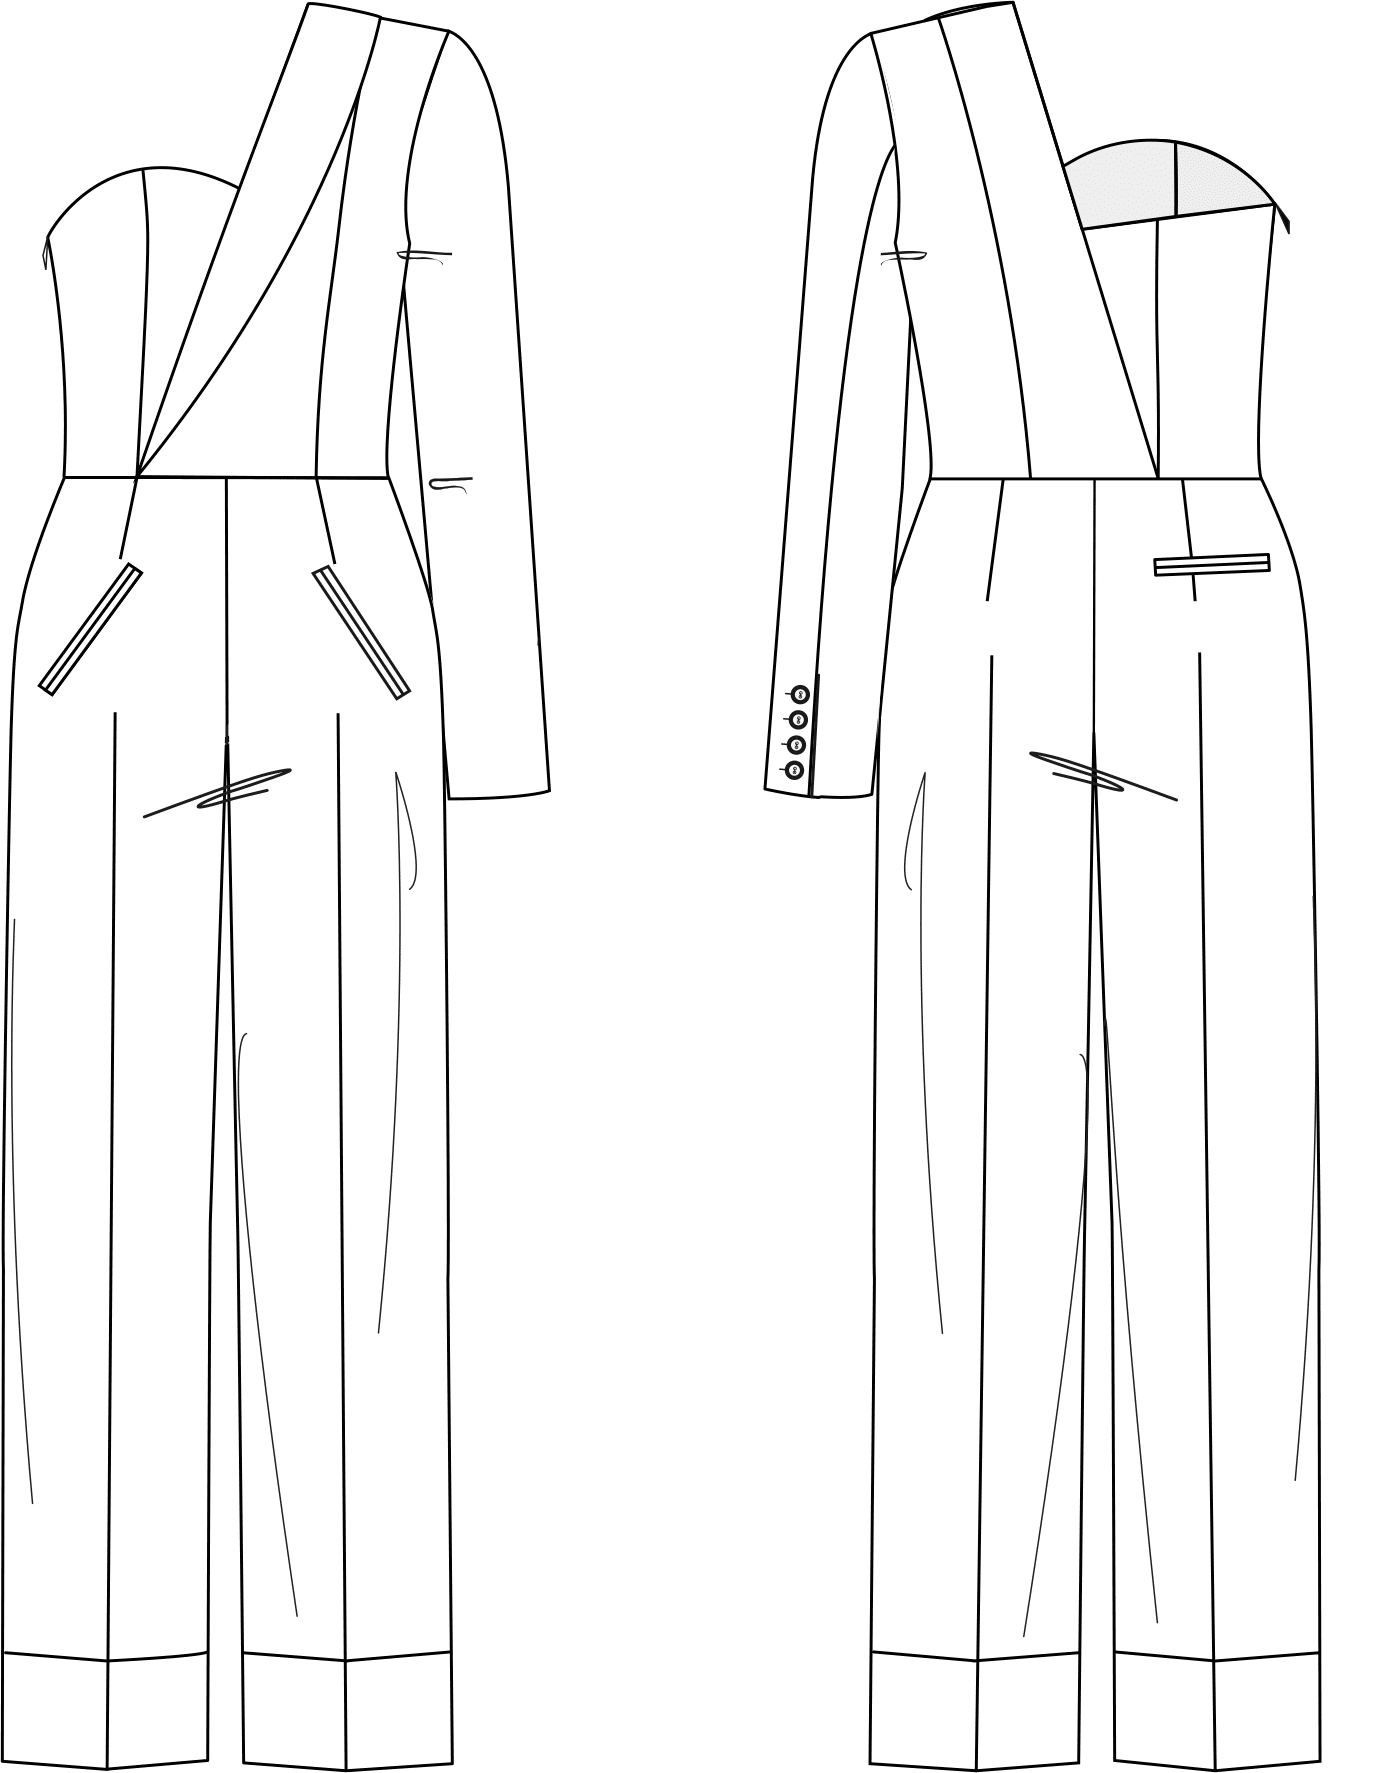 (Photo Credit: Technical Drawing S. Lindner)
Design 3 – Heart-Shape Overall
Template: Basic Blouse Block with Darts in Size 40, Wearing Ease: Scye depth + 0.5 cm, back width + 0.5 cm, scye width + 0.5 cm, chest width + 1.5 cm
Basic Pleated Trouser Block in Size 40, Wearing Ease/Finished Measurements: Front and Back Trouser Width 3 cm; Hem width 38 cm, Side Length 103.5 cm
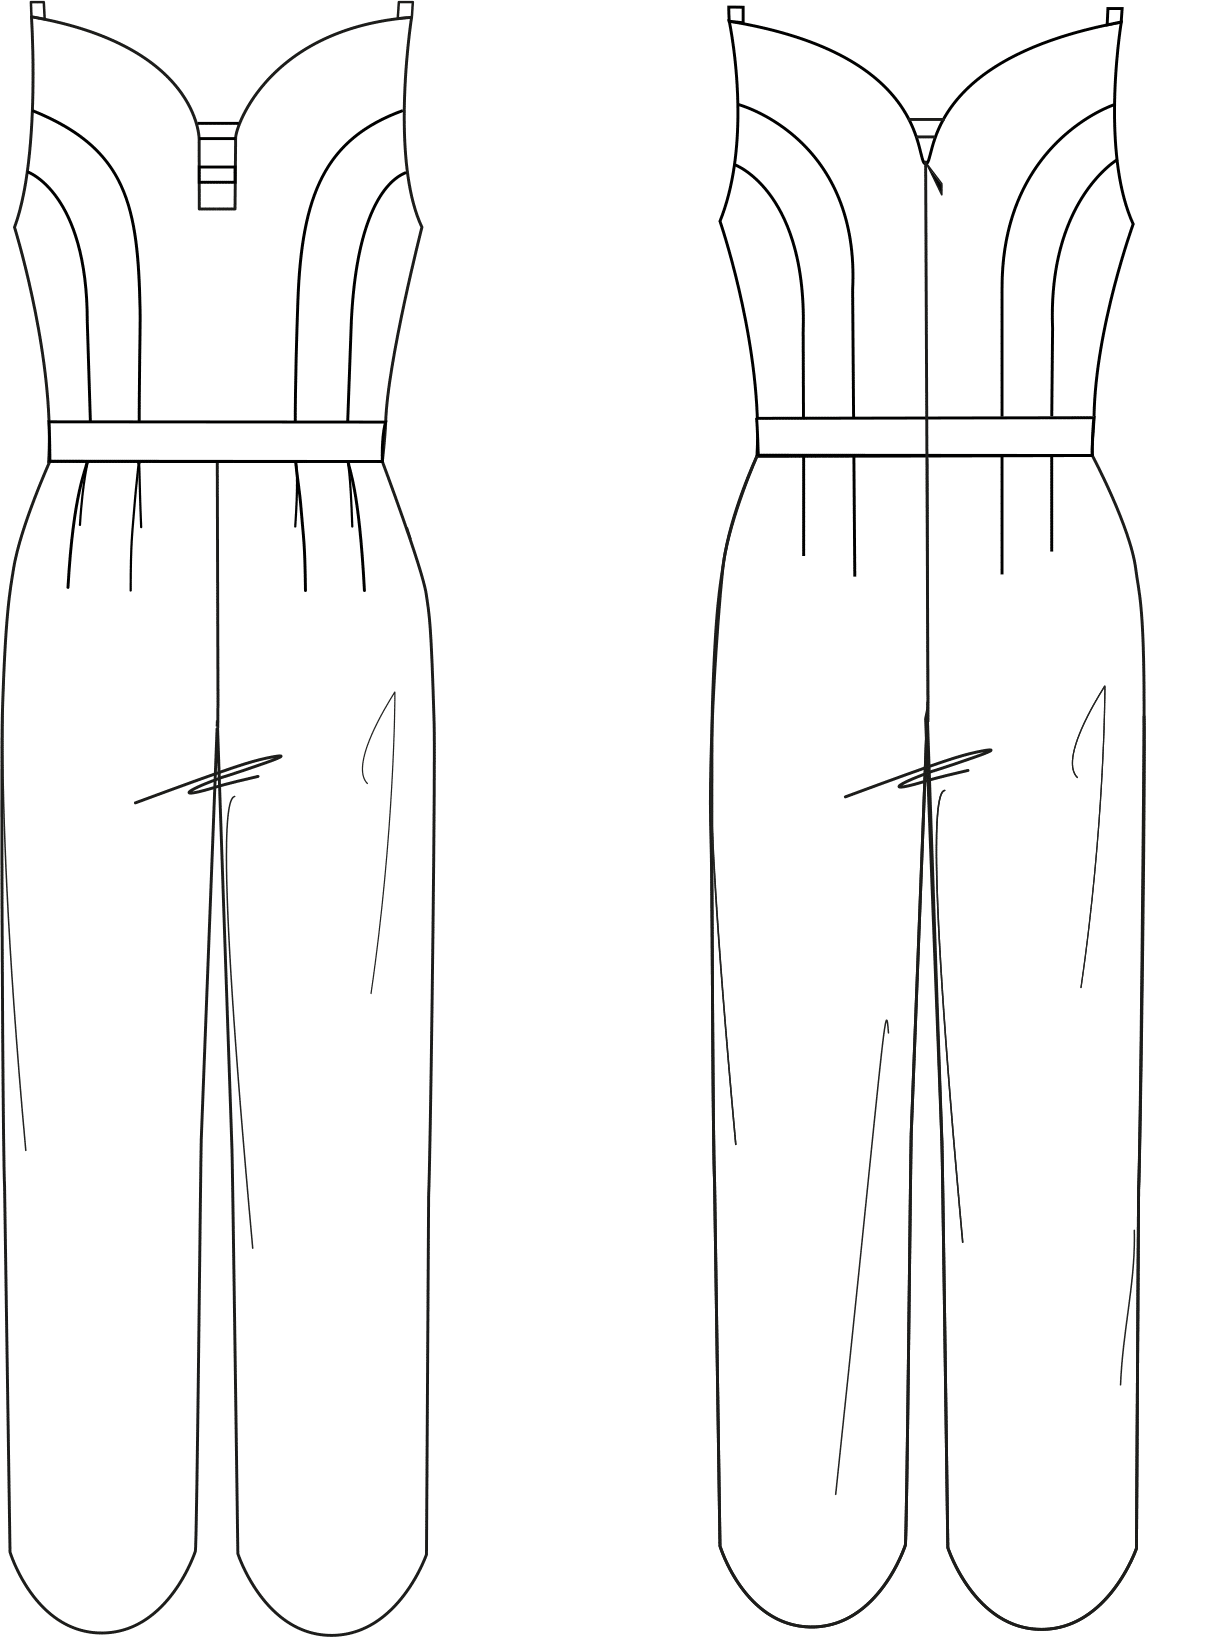 (Photo Credit: Technical Drawing S. Lindner)
Design 4 – Short-Overall
Template: Basic Blouse Block with Darts in Size 40, Wearing Ease: Scye depth + 3 cm, back width + 2 cm, scye width + 3 cm, chest width + 2 cm
Basic Trouser Block in Size 40
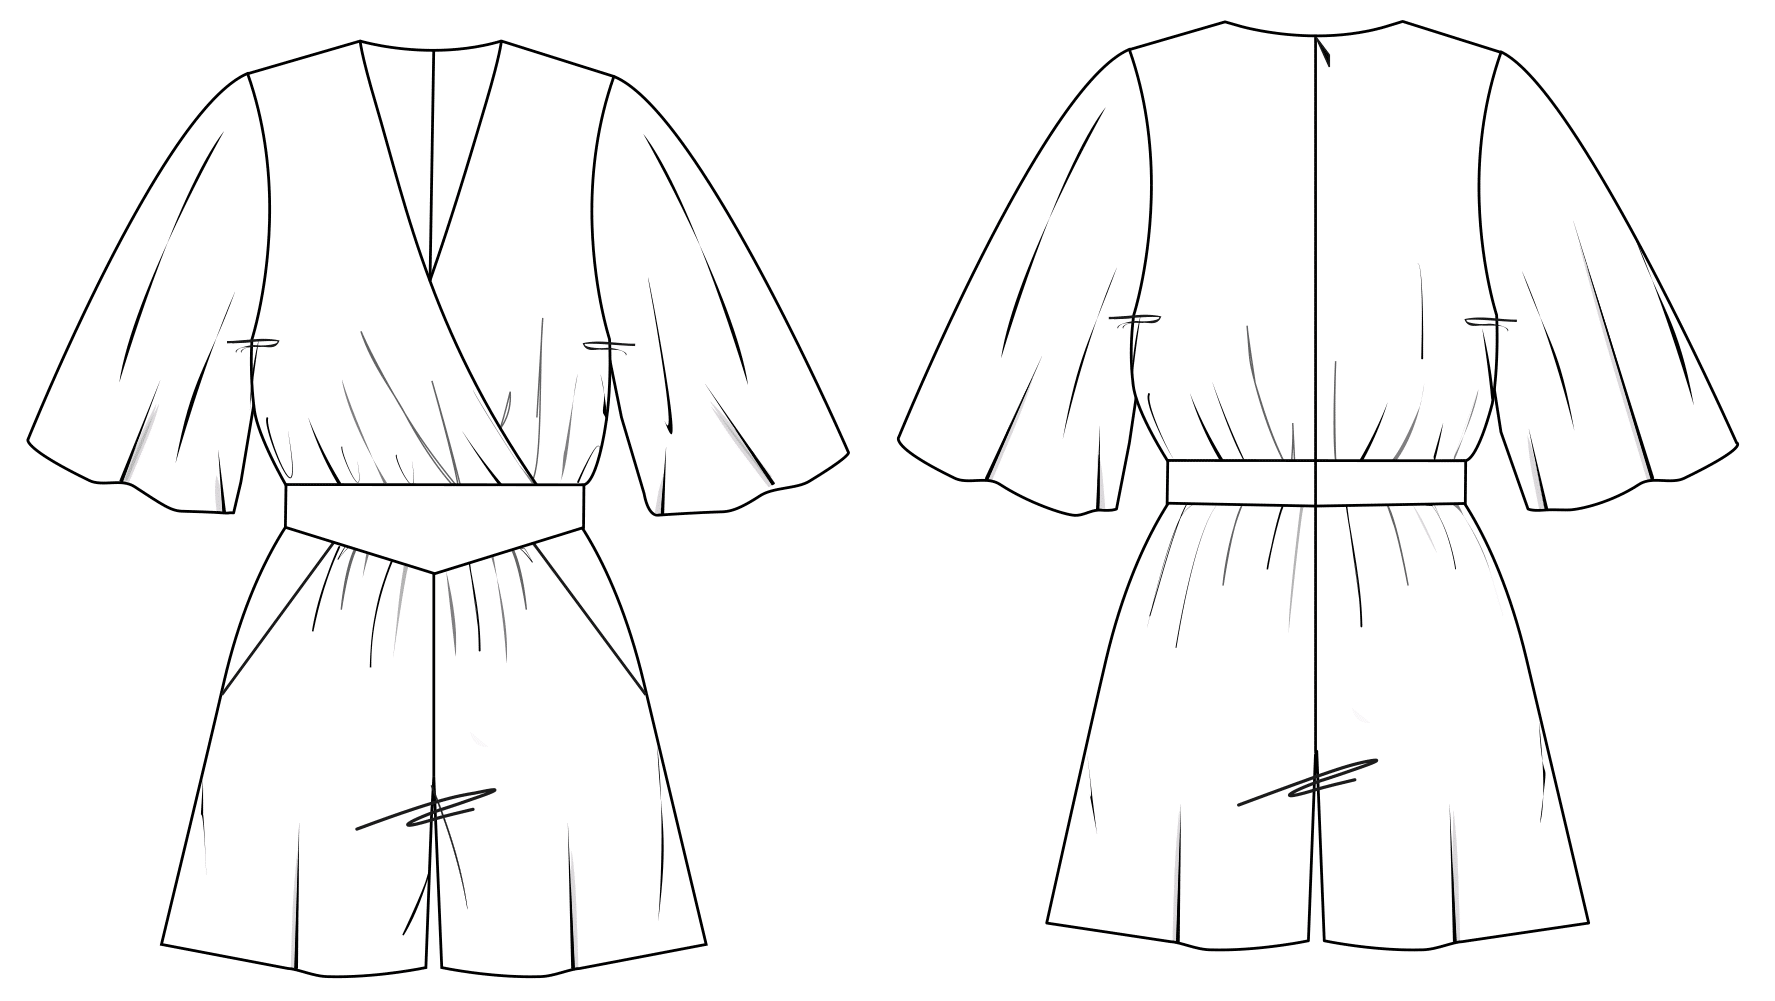 (Photo Credit: Technical Drawing S. Lindner)
 (Photo Credit: © CATWALKPIX.COM)


